👨🍳 Unleash Your Inner Chef with the SUNRISE Wok!
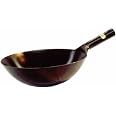
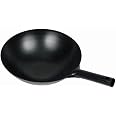
The SUNRISE 36cm Japanese Style Steel Wok is a professional-grade cooking tool designed for serious chefs. With a robust 1.2mm thick carbon steel construction and a generous 3-liter capacity, this wok is perfect for high-heat cooking on gas stoves. Its welded joints ensure durability, while the need for seasoning after each use guarantees a unique cooking experience. Ideal for restaurant settings, this wok is also a must-have for home cooks looking to elevate their culinary skills.
| Brand | SUNRISE |
| Model Number | COMINHKG042611 |
| Color | Black |
| Diameter | 14 Inches |
| Capacity | 3 Liters |
| Material | Metal |
| Compatible Models | Gas |
| Item Weight | 1 Kilograms |
E**E
No olvidar hacerle los preliminares
El Wok al ser de hierro requiere de un tratamiento inicial especial.Revisar en Youtube este proceso es muy importante
F**E
Excellent performance after proper cleaning, burning, and seasoning!
This Wok is a high performer IF...IF...If you properly begin your journey by properly prepping and then seasoning the Wok. I am a very advanced and award-winning Home and Personal Chef. I love to "wok" and often cook Asian foods, primarily Japanese (especially Tempura) and some Chinese meals like fried rice combos. A Wok is a tremendously effective tool for that kind of cooking and this particular Wok is performing brilliantly.Some of the features I really like about this wok's design include:++ Simplicity. It is lightweight and deep. Easy to flip cooking products one-handed.++ I much prefer the welded metal handle over riveted wood or bamboo handles. Professional++ Tenuous, but straightforward initial seasoning. Takes work but worth the effort in the long run++ Nice, building patina as continuously used. The picture with this review is after the first post-seasoning cook.++ With proper care, I have not seen even a speck of rust or flash rust.++ Outstanding Wok "Chi" which means the traditional Wok flavor that is imparted by carbon steel woks.Wok "Chi", also known as Wok "Hei" is one of the main reasons that professionals and knowledgeable cooks choose Carbon Steel Woks over non-stick Teflon and Stainless Steel Woks. Those others cannot produce that subtle flavoring that comes with properly polymerized seasoning in a Carbon Steel Wok. Yes, the others will cook food, but only properly seasoned carbon steel can impart that unique added subtle flavoring that makes Wok meals taste so good!There are instructions for initial cleaning and seasoning included with the Wok. However...I did not find those to be optimum and I use a somewhat different method for an initial seasoning that works far better in my opinion. The vinegar method that the instructions call for might work well, but I chose a different method and have been pleased with the results. You can use either one, or Google "Wok Seasoning" to find a plethora of seasoning methods. Here's what I did with great results...and one that will mitigate a number of problems that reviewers of this Wok here on Amazon have elucidated.1. The first step is to run water as hot as you can get it from your faucet and heat the wok with running water. Then I use Dawn dish soap and a stainless steel scrub pad to vigorously scrub the wok, both inside and out. This will NOT remove all the coating but will start softening or prepping the coating for the next step. I do this for about five minutes vigorously to the whole Wok.2. After rinsing out the Wok, I pour a small, but a generous pile of Coarse Kosher Salt in the bottom of the Wok pan. To the salt, I add a little cooking oil (At this point it doesn't matter what oil you use). Enough to be able to lightly coat the salt. Then using the same scrubbing pad, I vigorously scrub the salt inside and outside the Wok. I mean REALLY scrub! Again, this will not completely remove the coating, but that comes next...3. After rinsing and drying the wok, I take it to my outside Concord 200,000BTU Gas Banjo Burner and its Whirlpool Cast Iron Wok Ring (both available on Amazon) and prepare to completely remove the coating and get down to bare carbon steel.(NOTE: my method works faster because I have super high heat capability with the Banjo Burner. That being said, you can do exactly the same thing with a stovetop burner, but it will take patience and time to complete. It's a one-time operation, so do it right, take your time, and you'll never have to do it again!)4. There should be NO oil in the Wok for this step. Just a dry Wok. Kick up whatever you are using for heat to its highest setting. Make sure you have a heat mitt or pad for your hand, and I also suggest having a pair of Channel Grips (Long handled pliers) available that will make the process much easier by being able to maneuver the Wok from various edges...not just the handle.5. Place the WOK on the heat and wait. It might take a minute or two, but you will begin to see a change in color in the middle of the Wok pan. Keep it there until you see the color change spread to where it isn't spreading further at the same pace. The pan will start to lighten up where it is changing and may look totally silver, but not necessarily that color for it to get to that level. Once the color change has slowed, start slowly rotating the Wok towards its edges and follow the color changes up to the rim. Follow the sides around, using the handle and then the channel grips to get the color change completely showing from the center to the rim. Don't worry about damage. It will only damage the Wok if you allow the metal to get to glowing RED hot. Very difficult to get it that far. Use the channel grips to make sure you include the area up to the rim of where the handle is welded to the pan. Once you have accomplished this, turn off the burner and let the Wok come to just above room temperature where you can handle it with bare hands. DO NOT use water to try and cool it faster.6. Back to the sink and repeat step 1 and 2. Dry completely! At this point, the factory coating should be completely removed. There may be a small bit on the back of the Wok, but who cares at this point. It will eventually burn off and we are more concerned with the internal pan than the outside.7. From this point on, you are never going to use soap again! You will clean your Wok after cooking with nothing but hot water and a stiff bamboo Wok cleaning whisk or something like a green scrub pad. That's all you'll need!That completes the initial burn of the Wok to prepare it for initial and regular seasoning. Let's go...The purpose for seasoning a Wok is to provide a surface that over time will make the Wok cook evenly and essentially non-stick. As mentioned earlier, it also provides the base for creating that unique Wok Chi experience that will excite your taste buds. Here's my method for initial seasoning and maintaining the seasoning.1. Choose the oil or fat that you intend to use. It should be a high smoke point oil or fat. Do NOT use Olive oil for this initial seasoning. It has too low of a smoke point. Plant oil options include Grapeseed, Avocado, Coconut, Crisco, or as I prefer...Crisbee Pucks (Amazon) that are made from Palm Oil and Bees Wax. You can use a regular vegetable oil like Canola or Peanut oil as well. A number of people on Google and YouTuve push the use of Flax Seed Oil as being superior, but many studies and experiences have shown that it is not the "end all" for seasoning. The use of flax oil can flake later when used as a base seasoning, and frankly, you don't want to see flakes of hardened oil in your food. Additionally, I strongly recommend you do NOT use any animal-based fat for the initial seasoning. Those fats can easily become rancid in some conditions and can spoil your food...and potentially your health. They also do not polymerize to the surface as well as vegetable fats. Later, animal-based fats and Olive Oil can be used for general Wok cooking once the Wok has been properly seasoned.2. Turn on the heat to medium to medium-high. Heat the Wok for a couple of minutes and then turn the heat off. This will help open the "pores" of the metal to receive oil3. Using the oil of your choice, put in just enough to create about a quarter-sized dollop. With a lint-free paper towel or a lint-free cloth, spread a thin layer of the oil all over the inner bowl and then the outside as well. Once you have an oil sheen on the Wok, fold some of those paper towels and wipe out the whole Wok, inside and outside. Wipe it until it appears dry of oil! What you need is a micro-layer of oil on the WOK. You should NOT be able to visibly see any oil. It is there, so don't worry. It's just barely on the surface and working into the pores of the metal.4. If seasoning inside your home, now is the time to open your windows and doors and use any fans or vents you have because you are about to smoke up your house a bit. You might even consider turning off your smoke detectors. If you can do this outside...all the better.5. Put your Wok on the heat source and turn it up to HIGH. You are waiting for the smoke point of the fat you used. As it begins to smoke, rotate the Wok as you did in the original coating removal and make sure all areas of the Wok are reached. Once the smoke has stopped, remove the Wok from the heat source and let it cool down by itself to a point that you can handle it without burning yourself6 Under HOT running water, now wash the Wok without soap. Do not worry about losing the first seasoning layer you just completed...it won't! ONLY WATER. Dry the Wok completely and if necessary put it over low to medium heat to help it dry.7. Now for the fun part... Do steps 3-6 at least two to three more times and preferably four to six times more. Make sure that each time you only use a very small amount of oil, and only enough to barely leave a micro-oil surface over the last one.First cook for final seasoning...Now we need to actually cook in the WOK to add aromatics and the final initial seasoning to your Wok. As you continue to cook after this step, the color of your Wok will eventually darken and may even get almost entirely black. This is a GOOD thing. It will also be virtually non-stick.1. Prepare some aromatic veggies to use for the first cook. These include peeled fresh Ginger Slices, Green onions - scallions (cut about 1" long), and coarse onion slices. About a large handful or roughly two cups worth.2. Choose an oil that you are likely to use regularly to cook food in your Wok. I generally choose either Peanut Oil or Avocado oil. Begin heating your Wok on High Heat.3. When you can sprinkle some water in the wok and it evaporates instantly, put about 2 Tablespoons of oil in the Wok.4. Add your chopped veggies. They should start to fry almost immediately. Start moving them all the time. Don't let them sit for long.5. Using a Wok Spatula or similar, continue moving the cooking veggies all over the Wok pan. Push the veggies up to the rim of the Wok repeatedly to coat with a bit of the hot, cooking oil and keep moving them around.6. Keep doing that until you literally have burned the veggies to almost blackened, ensuring that you have consistently kept them making frequent contact with the entire Wok bowl. Once blackened, take the Wok off the heat and as it begins to cool, discard the veggies and the remaining oil. Wipe out the Wok with a paper towel.7. Take the Wok to your sink and using HOT WATER (NEVER use cold water on a hot or warm Wok!!) Rinse out the Wok and using the same technique as previously mentioned after each seasoning cycle, scrub out the Wok WITHOUT soap.8. Once cleaned of food debris, dry your Wok well and use heat if necessary.9. Using the same technique for applying a micro-layer of oil for seasoning, do the same to the Wok once it is dry. Make sure you wipe excess oil from the Wok so that you can hardly tell there is oil on the surface. It's there...It's OK!10. You can now store your Wok until you are ready to use next time without fear of rust forming. Follow the procedures from Steps 7-9 for all future Wok use.You have now completed the entire process of preparing your Wok for regular cooking. Just ensure that you use a little oil, wiped clean, to store your Wok after use. The seasoning, non-stick properties, and color will continue to get better and better over time.I have written this long review to address some of the concerns and complaints that have been prevalent in earlier reviews. I hope that this will help you not only to decide to start "Wok'ing", but also to allay your fears about seasoning and properly maintaining a Wok. This process is workable for virtually any Carbon Steel Wok.From my standpoint, this Wok and its 16" brother that I also own, are superb, traditional carbon steel Woks. I can honestly rate this Wok at Five Stars, and am happy to give it a very robust and hearty recommendation! AA++Bon Appetit!!
D**E
Wok
Brilliant
A**R
After the prep it all good
OK , I got this wok to replace a wok I did not like ( a wok sold here, which was pre-seasoned)1st. getting the factory protection off . I am using a High pressure stove . So Burning the factory finish off was easy and simple . I did not know how many "btu's" it is but I guess about 50 to 75000.It took minutes to get the bottom of the wok done .Total time was about 1 hour(for the complete wok)It was difficult to tell if the factory protection was burned off once the wok cooled down . So i did it again .Same problem . The wok returned to a dark color (appears to be a dark Blue on the outside it is easier to see) . So I am not sure , So I did it again . Just to be safe.I basically followed the instruction above ( the long instruction set) as they are very good and I have a really hot stove . Wish that person had condensed them into a more manageable format , but Thanks for your pitting it here . It was very helpful.I've only cooked once in this wok so I have limited exp. with it . What I will say is this . 1st. check your flame since the wok is thinner ,it doesn't need as much flame to really get it cooking . Since I 'm only a home cook and not a chef, this wok will take some adjusting(on my part) before I get dialed in as to how much fire I need to use (in general).I think it's a very good wok that will serve it purpose very well for many years to come . I cooked beef with broccoli and this wok cooked so fast I needed to turn down the flame as not to burn the broccoli. Once I did that cooking the beef was "easier" but still very fast .Result was the broccoli came out perfect . Crunchy on the outside and completely cooked on the inside . That's my test as to how a wok cooks . The beef was good since I'm not sure how fast to cook it yet , plus the beef I get here is not has good as what you get in the US.All in all I say buy this wok if you know how to use a wok already . But that's only my opinion . A thicker metal wok has it's advantages . More so for those who need to slow the cooking process down( a little)But for those of you who understand how a wok works , This is a fine wok for you . Just watch your flame. This wok might cook on a stove top really well sine it doesn't get the same fire/heat as a high pressure stove . Either way I give a thumbs up to this wok .
E**A
Me siento chef profesional
El resumen es: si quieres un wok profesional y estás dispuesta(o) a dedicarle el tiempo de preparación que requiere para empezar a usarlo, este es para ti.Este wok resultó ser una maravilla. Principalmente porque me salvó de los otros woks que son pesadísimos y porque me gusta que sea de acero sin recubrimientos. Es decir, no tiene teflon ni nada por el estilo de materiales tóxicos. En su lugar, me gusta curarlo yo mismo porque así me aseguro de que nunca se le peque nada y de usarlo aceite que le vaya mejor a este wok.Eso sí, antes de usarlo por primera vez, le tienes que dedicar un buen tiempo para seguir las instrucciones y quitarle el recubrimiento que tiene con vinagre y calor para después curarlo con aceite para que pueda tener la propiedad de “non-stick” o que no se pegue. Cuando se cura el wok de acero, lo que sucede es que cada capa delgada de aceite se cristaliza al calentarse y logra crear un recubrimiento natural que hace que la comida no se pegue. El proceso total a mí me tomo alrededor de una hora en lo que se limpia el wok y se colocan tres capas de aceite.
Trustpilot
2 weeks ago
4 days ago