🌿 Elevate your outdoor vibe with style and comfort that lasts!
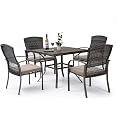
The Pamapic Outdoor 5-Piece Patio Dining Set features a durable plastic-wood tabletop with an umbrella hole, weather-resistant PE rattan construction on a sturdy iron frame, and comfortable, machine-washable cushions. Designed for easy maintenance and stability with adjustable table legs, this set is perfect for patios, decks, and gardens, supporting up to 275 lbs per chair.


| Assembly Required | Yes |
| Shape | Rectangular |
| Item dimensions L x W x H | 36.8 x 36.8 x 28.3 inches |
| Product Care Instructions | Wipe with Dry Cloth |
| Material | Metal |
| Manufacturer | PAMAPIC |
| UPC | 196852041930 |
| Item Weight | 110 pounds |
| Product Dimensions | 36.8 x 36.8 x 28.3 inches |
| Country of Origin | China |
| Item model number | Outdoor Dining Set |
| Is Discontinued By Manufacturer | No |
| Assembled Height | 28.3 inches |
| Assembled Width | 79.4 inches |
| Assembled Length | 79.4 inches |
G**.
Outstanding customer service (see additional information). Overall nice. Assembly is not that bad
*Based on an issue I had and the responsive vendors support, I am updating my review. See the additional edit below.Nice table set for our covered patio (the seat cushions could use a bit more foam, but overall they are very comfortable).Don't be put off by fear of assembly.able- the table is fairly easy. When fastening the legs to the table, snug the bolts only hand-tight. After fastening the frame, tighten the frame [A3] first, then finish tightening the legs to the table. Tighten all at once so the legs align at the same time.Don't forget to check and tighten the plastic feet on the leg bottoms.Chairs: like all knockdown furniture, insert bolts carefully hand tight only. Apply criss-cross. Tighten only at end. Bolts could strip, so align carefully (we had no problem). If you experience trouble with alignment on a particular connection, loosen the other bolt(s).There may be some resistance due to the paint. At one point, I thought that I would need to drill out a hole in the table leg- the bolt would not pass through the hole. Turned out to be the paint thickness; carefully threading the bolt through beforehand displaced the paint and solved this.Two people are helpful in steadying the parts in place, but assembly *can* be completed by one person. My daughter and I completed it in about 35 min.Hope this helps; it's not really a big deal and a nice set. We use it daily and after a month, it still looks new (under a covered patio).*Update: 5 months later...While attempting to clean off some persistent paint overspray from an outdoor paint project, I damaged several of the table slats by using a solvent-based cleaner. This was a pure bone head move on my part as the table top slats are 'plastic wood', so, yeah, I should have known better, but was in a bit of a rush 8-(The result, of course, was several discolored streaks on several table slats where the plastic dissolved.I contacted the vendor with the intent of purchasing several of the 'plastic wood' table slats that I could swap out. I made it clear that the negligence was mine and inquired if I could possibly obtain them. The table still looked great after this time.The vendor responded that they could *not* provide the individual table top slats, but instead offered to send a new table top for free. In the end, they covered the shipping as well!This was totally above and beyond any service I could ask for or expect. The replacement tabletop came in immediately within a few days.I am raising my review to 5 stars based on not only customer service alone but also overall product features. We have a stone patio, and the leg levelers compensate for any unlevel table wobble. I actually like the faux wood plastic table top, as it is simple cleanup (as long as you don't use solvent ;-)We use our patio set daily; it does look as nice as presented in the sales pictures.
S**Y
One person CAN put it together
The entire set took about 2-1/2 hours to complete unwrapping and assembly by one person (me). The set will not see the outdoors until Spring but it seems to be sturdy.Some tips for assembly by one person,Use the enclosed instructions for the bolt location and size only.Chairs - lay the chair back on a table seating face up. Install the bolts to the legs. Attach the seat to the chair back and then to the legs. Install all bolts LOSELY. Set the chair upright and on a level surface. I used a table for this task. Once upright, wiggle the chair gently to allow the bolts to position themselves. Begin tightening the screws as you would when changing a tire. From your first position ex: Left front, move to the right rear and then the left rear and finally the right front. Also snug the bolts to the seat back from the seat and arm. Once everything is snug, again wiggle the chair to ensure that it will find level and proceed to use the same procedure to complete the final tightening of all of the bolts. If you fail to do the tightening in the cross chair manner, it can pull the chair into a twisted and uneven mess. NEVER tighten bolts by going around the furniture in a circle.The table is a little more tricky but doable by one person.Lay the table top upside down on another table or the floor. Install the 4 legs loosely but kind of snug so that they will not move excessively when you are putting the umbrella guide in. Place the center support umbrella guide into the welded supports on the legs and put one screw in each of the 4 locations around the table. Once this is done go around and put in the other 4 screws. Next look at each bolt location and ensure that the table supports look symmetrical and even. Start snugging up the screws in a star pattern as described above so as not to "pull' something out of symmetry. Continue going around the table until all screws are snugged up. Again, look for symmetry before the final tightening of the bolts. If all looks good, complete the tightening process using the star method. NEVER tighten one side and then the other.If you do as listed, it is highly likely, barring any manufacturing defect, that the completed patio set will be solid and square with all feet on the ground.Good luck and I hope this helps as the so-called instructions are just pictures.
Trustpilot
5 days ago
2 weeks ago